Well, my eagerly awaited box of Panzer IV's from the Plastic Soldier Company finally arrived. It was an impulse-buy following the announcement from North Star Military figures that they had recieved a few pack of Viking Dice for Saga. While ordering these I happened to order the Panzer IV's as well. It was an honest mistake, guv, swear on my mother's grave. Collateral shopping you might call it.
Anyway, I ordered two weeks ago. A parcel from UK to Sweden used to take about a week. If you were lucky you could order on monday and have it arrive on thursday, but usually it would arrive the next monday. I was able to calculate that the mail flights were on sundays and wednesdays from the regular arrival of my orders; always on mondays and thursdays. But nowadays it usually takes almost two weeks. Either the UK or Swedish postal services have really cut down on their staff or the amount of packages has increased enormously.

But on to the kit. The box contains three Panzer IV tanks and costs around £13. The tanks are fast-build, meaning that the kit has few parts and is aimed at wargamers. It is computer-designed and simply an up-scale of their 15mm kit. Although some of the details are simplified the overall detailing is good and the tanks really do look the part. Fastbuild kits for wargamers have been around for a while, but what's unique about this kit is that it offers the possibility to build four various versions of the Panzer IV. But more on that later. Let's take a look at what's in the box!
Inside the box there are six sprues of components, three each of two variants, and a sheet of instructions. The parts fit together well.
 |
| The first sprue contains the lower hull, the wheel assemblies, tracks and side armour or "skirts". |
 |
| The second sprue contains the upper hull and turret parts. |
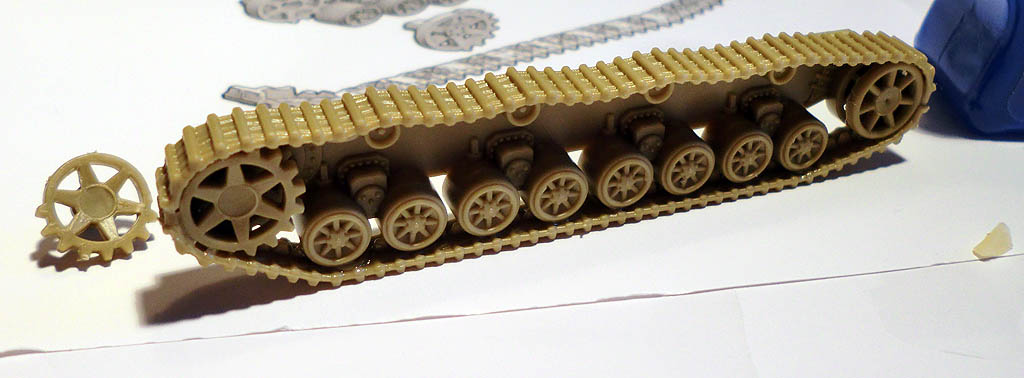
Track assembly is a breeze; you glue the outer halves of the the sprocket and idler wheels in place. The inner halves are cast on the hull sides as are all the road wheels. Affix lower track which is all in one piece, and then the upper track piece. The track have a nice sag to it and is reasonably detailed. It's appearance is marred by a few ugly ejector pin marks (from where the sprue is pushed out of the mould), but they are not very visible since they are on the underside of the track. Another downside is that the road wheels should be double with a visible gap between the discs, but in this kit they are solid and extends all the way into the hull wall. This is a limitation of the cast which is necessary for ease of assembly. With separate wheels the kit would be much, much fiddlier.
 |
| The first track is assembled. Note the ejector pin marks where the track lacks detail. |
I've read tips about glueing the tracks in place before glueing the outer half of the sprocket and idler wheels when assembling the 15mm version, but I had no problem whatsoever with my kit. Beware though that there is a difference between the left and right sides and make sure you dryfit the tracks before glueing. If you do it wrong there will be some unsightly gaps -- some reviews claim that the tracks doesn't fit properly, but they do if you turn them the right side around...
 |
| If you look carefully you can see the simplified road wheels. But not the ejector pin marks. |
Hull assembly is very straight forward. The track assemblies are glued to the lower hull, and the superstructure is glued on top. The engine deck is one piece, as is the backplate with the exhaust details and they glue in place quickly, as is the front glacis plate with the hull machine gun and the drivers visor.
 |
| Finished hull. The superstructure details are acceptable. |
Some of the superstructure details are a bit crued, as the Notek light and headlamps being represented by an oval piece of plastic and two round bumps. On the other hand I have always had problems glueing these small pieces on any "real" kits I have built over the years, and they invariably get knocked off so I think it's a reasonable trade-off. There are some tools moulded on as well as various hatches and rivets here and there. I don't know enough to judge if they are accurate but to me they look credible. I thought the side vision ports were a bit bland bland though, they at least need the vision slit to look good.
 |
| The turret main parts. Be sure to glue the hatches the right way around, the vision slit goes forward. |
The turret goes together just as easily. The bottom of the turret is one part, the entire upper part of the turret is one part. Glue together. Then the turret bustle and hatches goes on. You have a choice of open or closed top hatch as well as two different guns -- short barrel and long barrelled 75mm gun. If you decide on open hatch you have a choice of two different commanders (or anything from your bits box of course).
 |
| The two commander figures, Hans und Hans. The fit into the hatch is real snug. |
So now maybe it's time to talk about the different versions available. The Panzerkampfwagen IV, or panzer IV for short, was first developed during the mid 30-ies. As war progressed it went through a series of "ausfürungs" or marks which was denoted by letters. This kit allows you to build either an Ausf. F, F2, G or H. However there has been some compromises made to achieve such versatility, and no mark is really 100% accurate. I'm no expert, but about 30 minutes googling and looking in my "Squadron/Signal PzKpfw IV in action" gave me an inkling into the matter.
 |
| Are you happy to see me, or is that a 75mm L/48 gun in your turret? |
- I believe the F or F1 version is the most accurate to build. It features the short-barrelled 75mm gun, included in the kit.
- The F2 version is essentially the same as the F1 version, except for the long-barrelled gun. So just sticking the longer gun onto the turret would give an accurate F2, right? No, because the F2 gun had a single baffle muzzle brake, and the version in the kit is the double baffled muzzle brake found on the G and H versions.
- The G version was simplified compared to the F2 version, so you need to file away the side vision ports from the hull and turret, as well as the right hand side vision port on the front of the turret. The G version also had an extra armour plate bolted onto the hull glacis plate in front of the driver as well as extra side armour around the turret, the latter are included in the kit.
- Finally the H version looks very much like the G version except that it also got extra armour skirts on the side (which are included in the kit) and that the commander's cupola recieved a single hatch instead of the double hatch used in the earlier versions. Oh, it also has an external air filter for the engine, but that part is actually included in the kit.
 |
| Do you feel lucky? Well, do you, punk? |
Of course, this is supposed to be a quick and easy kit for wargamers to build, and it does it's job. While it does look crude compared to an Italeri or a Dragon model, you get three for the same price as one "real" kit, and all three will take less time to assemble. The finished tanks are robust enough to be handled by sweaty stubby-fingered wargamers. So it all boils down to how much of a river counter you are.
 |
| Hang on, there are more parts... where do they go? |
The biggest let down is the instructions. They consist of an exploding diagram of the main parts but leaves out some of the extra parts. There is also an overview of the sprues with some colour coding to show which version uses which parts, but it is partially incorrect. With the help of google it's easy to figure out where all the extra bits go and what parts are for what version, but would have been nice if the instructions had covered that from the beginning. In the picture above the two "pipes" are the air filter for the H version. Then we have a toolbox as well as some extra road wheels. On the other sprue there are two jerry cans and a piece of extra track.
 |
| Finished! Note the toolbox which would be replaced by the air filters on the H version. |
I chose to build the F2 version for use on the eastern front in 1942. I'm thinking of buying some turned brass barrels with the correct muzzle brake, mostly because I really like the look of the early single-baffle barrel. That would increase the cost of each tank by around 50% though, and I'm not sure it's worth it to be honest.
 |
| I will of course drill out the barrel... |
I chose the classic arrangement of the box with extra road wheels on the left side of the tank. I think that on the H version the toolbox is moved to this side to give room for the air filters, so the extra road wheels would be mounted in brackets on the rear hull instead. Naturally tankers would stow equipment on their vehicles in their own way and there are pictures showing just that so I will be doing some variants for the other two tanks.
 |
| Squirrel!!! |
I mounted the extra track on the front glacis, partly to hide the gap between the upper and lower hull which I didn't notice until the glue already had set. In real life there would be a steel bar holding the track in place, so I will add that from a piece of sprue. Spare track could be mounted on various places for extra protection, sometimes even welded on, and if you are building the later marks you could just use track to hide the vision ports instead of carving them off.
In summary these are highly recommended kits that are great value for their cost and look really good when assembled, unless you are a rivet counter. Perfect for wargamers.
I give the Plastic Soldier Company 1/72 Panzer IV kits 5 out of 5 if you are a wargamer.
I give the Plastic Soldier Company 1/72 Panzer IV kits 2 out of 5 if you are a finescale modeller or a rivet counter. (3 out of 5 if you want some cheap kits to make wrecks or want the F1 version.)


These will most certainly do for me. I am still working on the Revell LRDG kit and I am convinced that my scale modelling days are over and war gaming modelling is the way to go.
SvaraRadera